Making Eon: Effects Part 2
Space Intro
The “Space Intro” part runs at 50 fps and uses dual-playfields in order to have two bitmap layers scrolling independently of each other. The layers are 7+1 colors each (0 is always transparancy) and then we also have some rendering going on on the layers. Lets break it down from back to front. Notice that bitplane setup is slighly different in dual-playfield than regular so I will use the name naming here.
Bitplane 1 and 3: Scrolling background
Bitplane 5:       Rotating object
Sprites:          Asteroid in the middle of the object
Bitplane 2 and 4: Scrolling foreground
Bitplane 6        Lines
Given this setup it means that we use the foreground and background images are 3 colors each and we use the top colors as white to be reserved for the rendering of object/lines.
Rendering
Something that we use quite a bit in this demo is to have the copper drive the rendering of the Blitter. It means that the copper needs to wait for the blitter to be finished before starting the next blit but it means that the CPU doesn’t have to use expensive interrupts when an blit is finished or do busy waiting on the CPU side so we essentially use the copper as a command-buffer for the Blitter to perform the rendering. Lines for the mesh and for the foreground is rendered using the blitter and also the filling for the object is done using the blitter.
The observant may see that the object is actually rotating in-front and behind the sprites. There is no way to configure the sprites to do that with the hardware so how do we achieve this? What we do is to split up the rendering of the mesh into some extra passes so lets break down the rendering passes that’s are needed.
1. Clear offscreen buffer
2. Render blitter lines for the object that is infront of the sprite
3. Fill the offscreen buffer
4. Clear bitplane 5 (we clear/fill only a section of it to save DMA time)
5. Render blitter lines for the object
6. Fill bitplane 5
7. Composite step 3 with actual actual sprite.
8. Clear or render lines to bitplane 6 (alternative ever other frame)
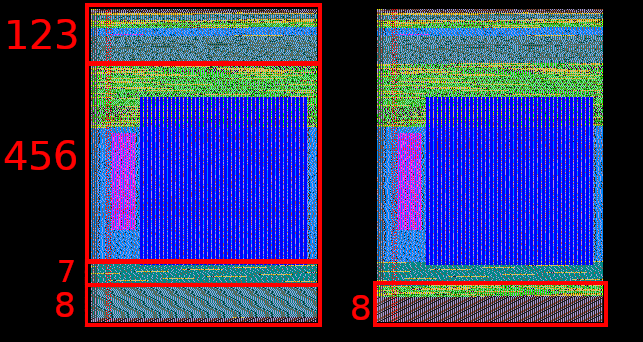
And this gives us a DMA timing that looks like this for two frames (see dma-timing for a description of the colors)
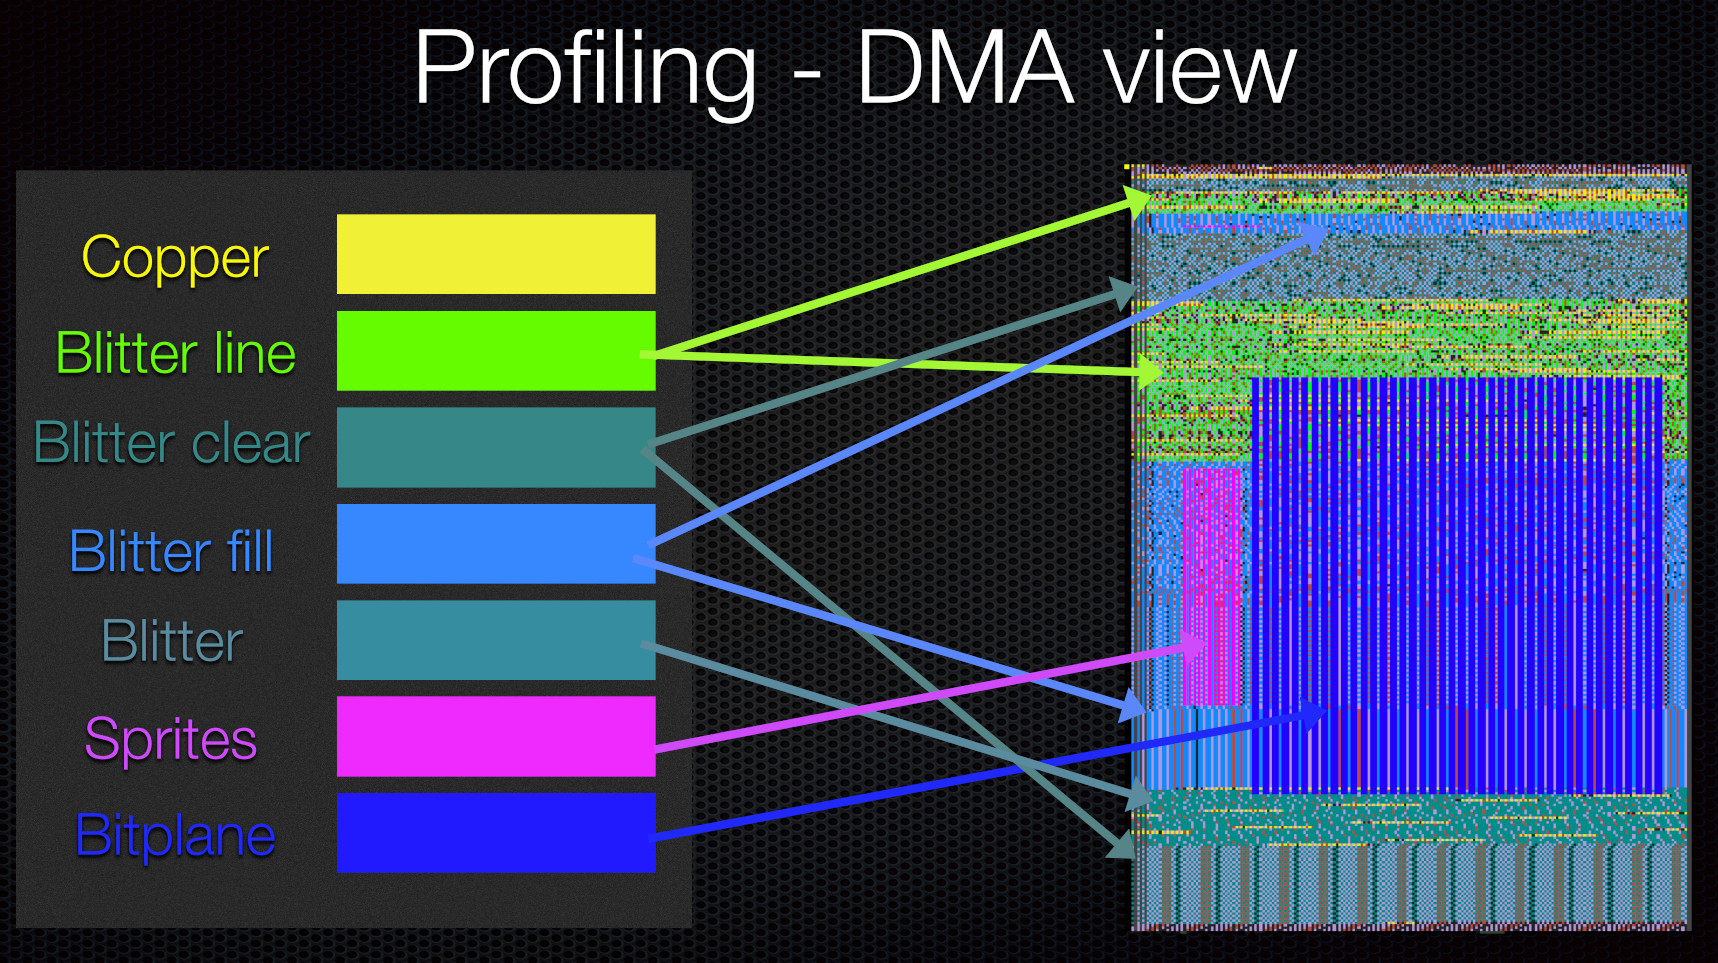
Step 1-3 is straight-forward as it just does regular clear, line-render and filling and this is the same with step 4-6. Now for step 7 we need to composite the data rendered with the blitter into something that the sprites can store. While not difficult the sprite layout differs from regular bitplanes so several blits are needed in order to merge the rendered data with the sprite data and this can be seen in step 7.
Step 8 was a problem for us because we are out of DMA time and we would had to drop down to 25 fps if we couldn’t find a solution. What we do is to have the fore-ground lines being rendered in 25 fps instead and we alternative the clearing / rendering of lines ever other frame to reach the our target for this part. That way we could still have the rest of the part running at 50 fps while the lines are in half frame-rate which doesn’t actually matter that much as the simulate a lighting effect which is a bit sporadic anyway.
The lines has been made in Houdini and then a custom tool would take Alembic data as input an export a delta-compressed position stream. We thought about adding some tooling for this in the run-time instead but it was easier to be able to use all the tools in Houdini as it let Calladin produce the result he wanted to have.
Solar Eclipse
Solar Eclipse runs at 50 fps and uses the sub-pixel rendering on the Blitter as detailed in blitter-sub-pixels We wanted to have the effect move slowly and having no sub-pixels would have made the effect not as good looking. Here is a compare side by side with sub-pixels and not.
This is with both sub-pixling of the blitter rendering and image scrolling. Notice that the OCS Amiga have no way of sub-pixel scrolling an image so how would it look like if we didn’t add this?
The rendering looks nice and smooth but the image scroll doesn’t look very good. One idea would be to try to switch to a higher-resolution mode such as hi-res which has a width of 640 instead of 320. It turns out that on Amiga OCS scrolling on 640 only happens every other pixel so it doesn’t help us at all.
Sub-pixel scrolling images
I will describe how this works on x-axis only as it makes it a bit easier to explain but the exact same idea can be applied to this but except with need to take both y and x step into account instead.
To begin with is actually sub-pixel in this context? It means that we read a pixel “in-between” pixels and put it on the screen. For example if we were to scroll 0.5 pixels and had pixels A and B in a row we would need use a formula (such as average) to get a new step between them. Doing something similar to this on the Amiga 500 while having already lots of other things to do at the same time would be way too slow. So instead we calculate a number of sub-pixel images offline and select between them. This is how it works
1. Take the image we want to sub-pixel scroll and first figure out how many steps we want to take. In this example we want to do 4 steps meaning we have 3 extra steps per pixel.
2. Convert the image to floating point from indexed format.
3. Convert from gamma to linear space.
4. Resize the image by making it 4 times as wide using a filter (such as sinc, bilinear, etc) We found that the mitchell and blackman filters works the best for us.
5. Convert back from linear into gamma space.
6. Quantize the image to desired bit depth (for OCS we need 4-bit indexed palette) We use histogram based quantizer that usually works good enough
7. Take colum 0 and move to image 0, colum 1 and move to image 1, etc
8. Repeat step 7 until there is 4 images of equal size as to the input image.
If we have this image as input

We get this output.
![]()
The different between the images doesn’t look that big but lets take a closer look (for the sake of this write-up I’m using 8-bit pixel pixel but the idea).
This creates a much smoother look when the image scrolls across the screen. The downside of this is of course that it takes 4x the time of memory. So what we do in this part is to reduce the screen size to exactly the size of the background image (224 in width) and use the hardware to move the display window instead. This way we don’t actually need to scroll the images over the screen which would have consumed even more chip-mem.
Rendering
Going a bit more into detail of the rendering is that we render two filled circles with the blitter. The first circle is rotated as a simulation for the outer edges of the sun and we apply some noise by having a 2d look-up table makes the look not as static. The other circle acts as a mask for the eclipse effect. We again use the copper to kick of the blitting. We have to do some trickery here to make sure that the blits gets started in the right place in the scene because we have a some copperwaits for top and end of screen as we are scrolling things around and need to disable the bitplanes under it otherwise it would wrap around.
The last part of the effects is a static image but we also re-use some of the rendering of the outer solar edge to give some more life to the effect